Atlas Chatbot Onboarding – From Zero to Hero 🚀
Welcome aboard! These tasks will help you understand the core concepts of building conversations in the Editor and testing them through Webchat & TellUs. We’ll start simple and increase complexity step by step.
Feel free to ask anyone from the team if you need help — we’ve all been there 😄
🌱 Getting Started
Creating a new Flow
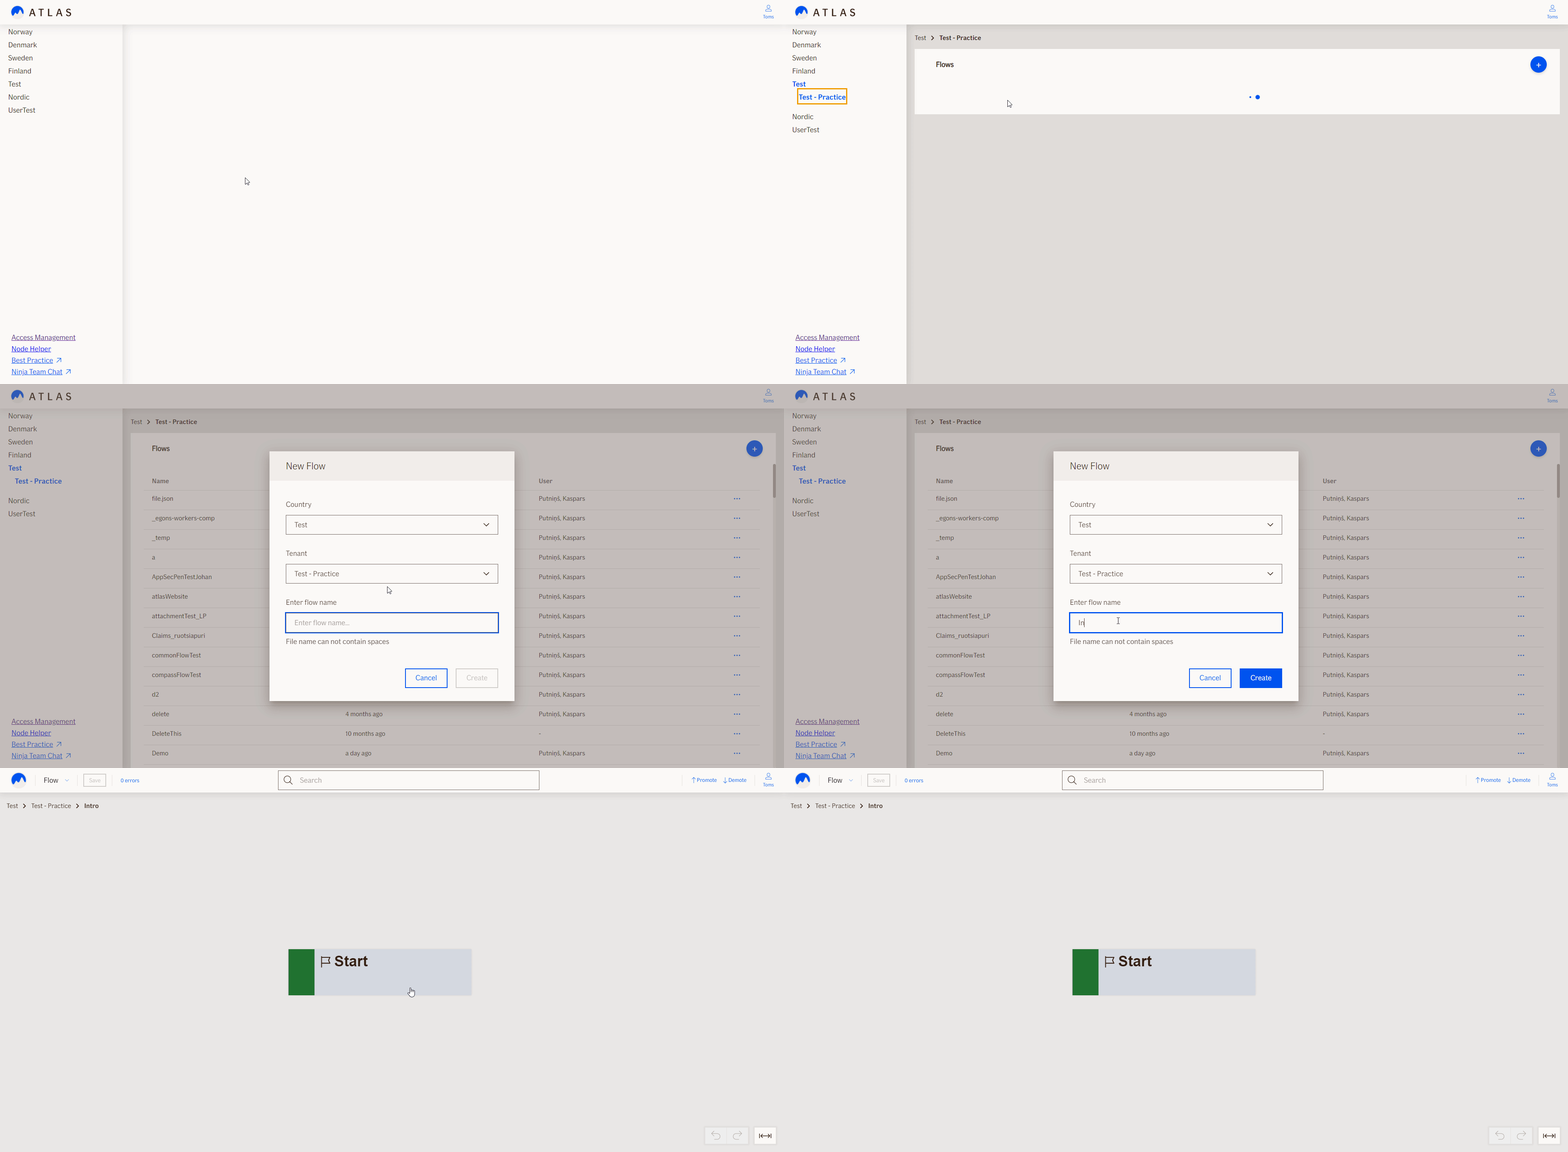
- Go to Editor – https://atest.editor.atlas.ifext.biz/
- Select a Country (or
Test) on the left. - Choose a Tenant
- Click the + button on the right side of Flows table.
- Fill in details → Create.
Testing a flow in Webchat
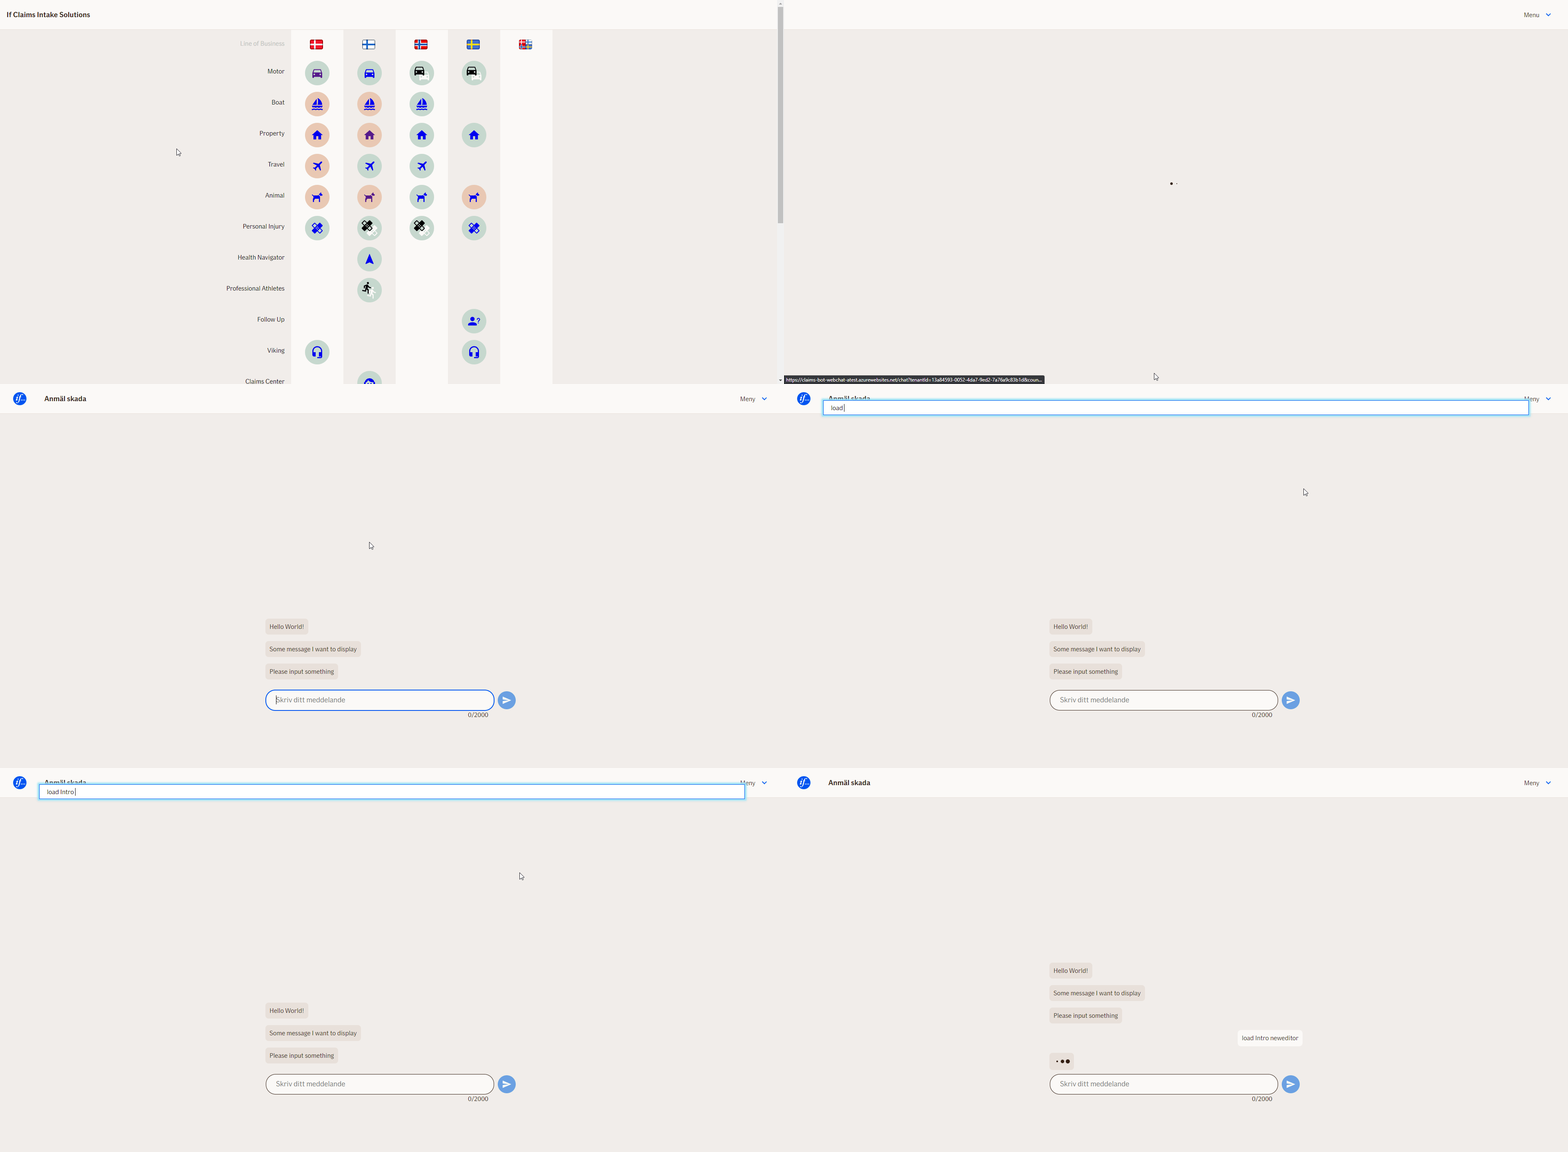
- Open Webchat – https://atest.atlas.ifext.biz/homepage
- Select the same Country & Tenant.
- Webchat loads
file.jsonby default — we want our own flow! - Go to Console (Dropdown or
Ctrl + Shift + F9). - Run command:
load <flow-name>
Example: load greetingFlow
🤔 "Nothing appears in Webchat!" – Fix
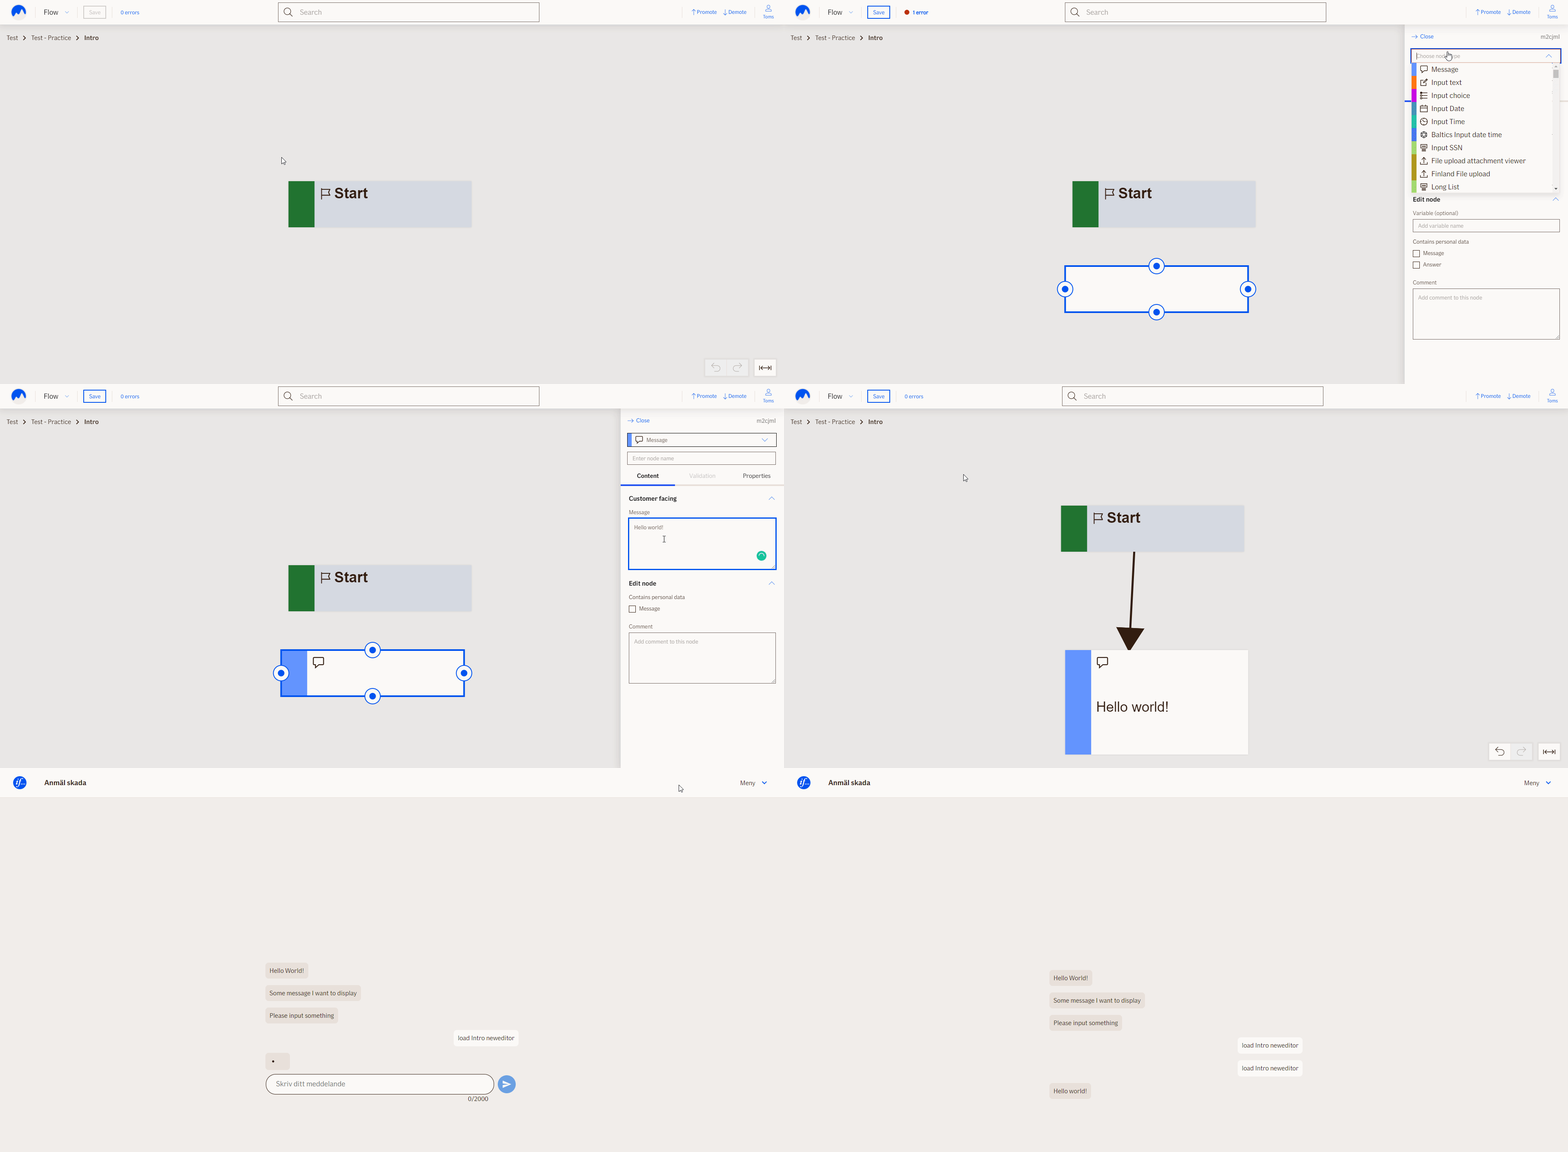
- Go back to the Editor
- Create a new node:
- Right‑click empty space → Create new node, or
- Ctrl + Click empty space
- Set Message type → Message
- Add text
- Connect Start → your node
- Save and reload flow in Webchat using
load xxx
✨ Task 1 — First Node
📌 As a customer I want to be greeted when I open the webchat so that I feel welcomed.
Acceptance Criteria:
- Greeting message appears when flow loads
🧠 Task 2 — References
📌 Chat should use the customer’s name after asking for it.
Acceptance Criteria:
- Chatbot asks for the customer name
- Responds:
Hello <name>
New concept: References
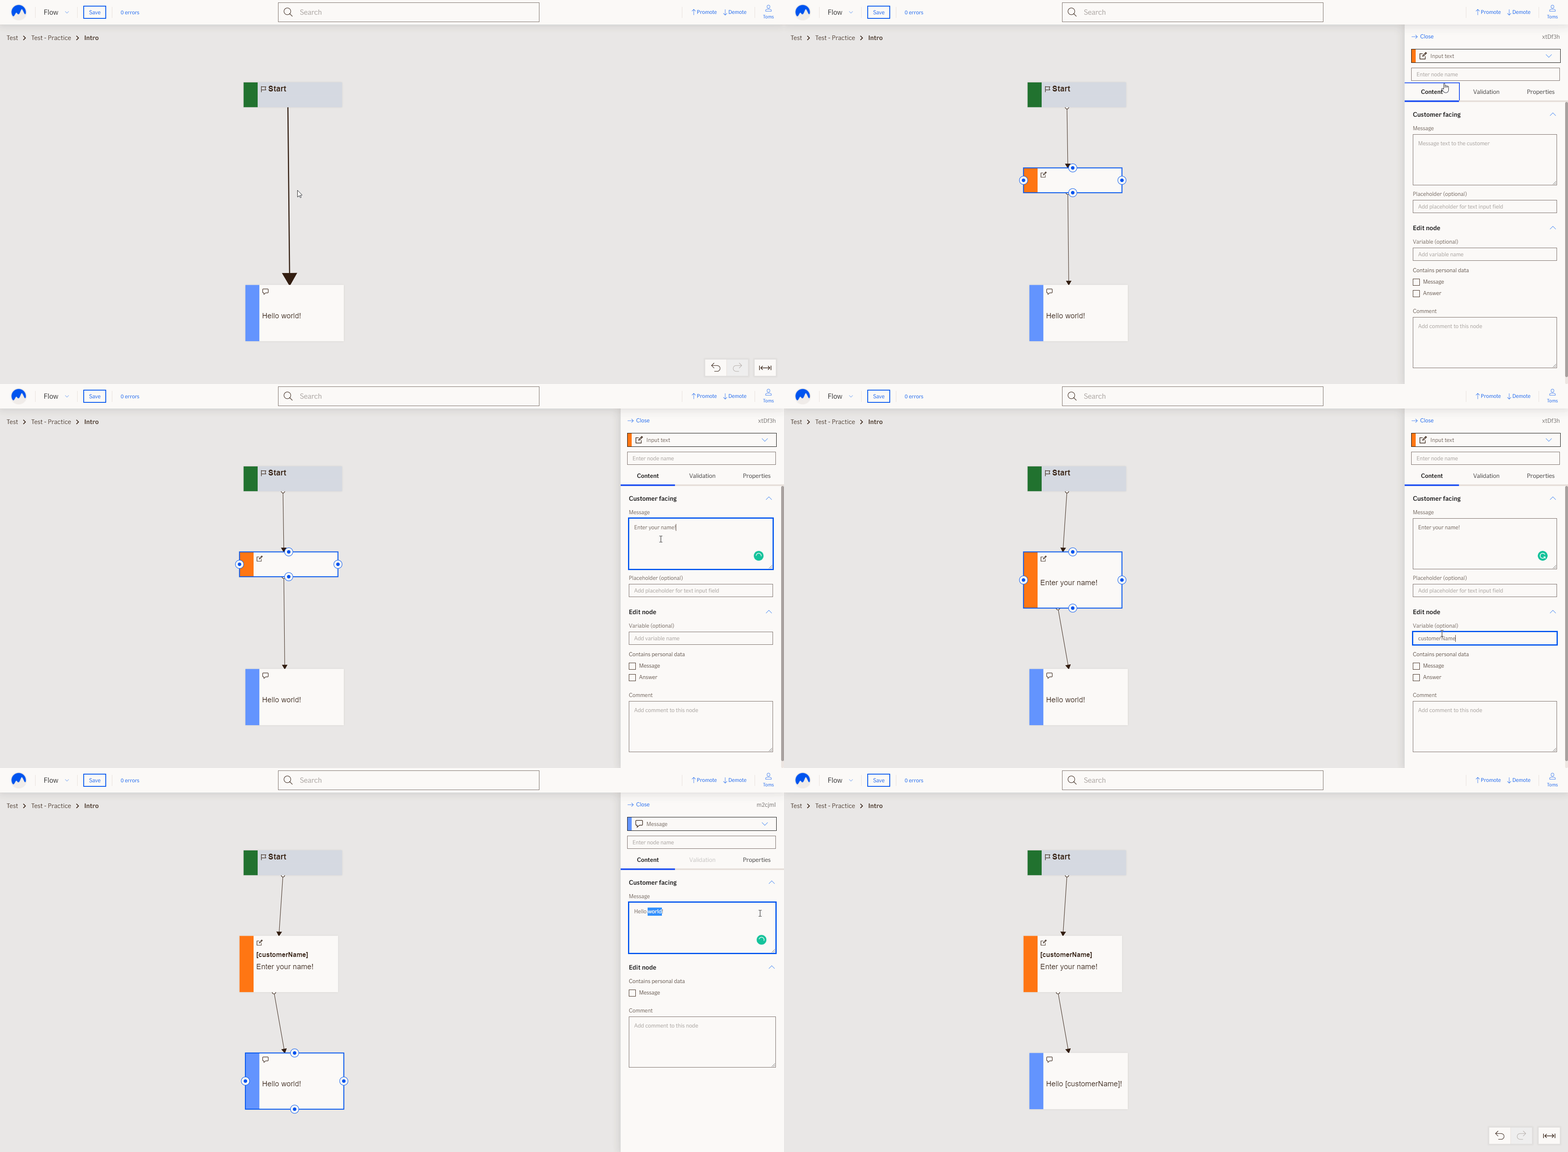
- Set Variable name in node configuration
- Use
[variableName]in next nodes
💡 References is the way how a value from one node can be passed to another. To do that first you need to set the “Variable name” field in node configuration. Reference to that node’s value can be made with square brackets around the variable name you entered
Example:
- Input node variable =
userName - Message =
Hello [userName]!
🗳 Task 3 — Choices
📌 Customer chooses whether they want to share their name.
Acceptance Criteria:
- Only ask for name if customer agreed
- If no name → reply
Hello stranger!
New concept: Choices
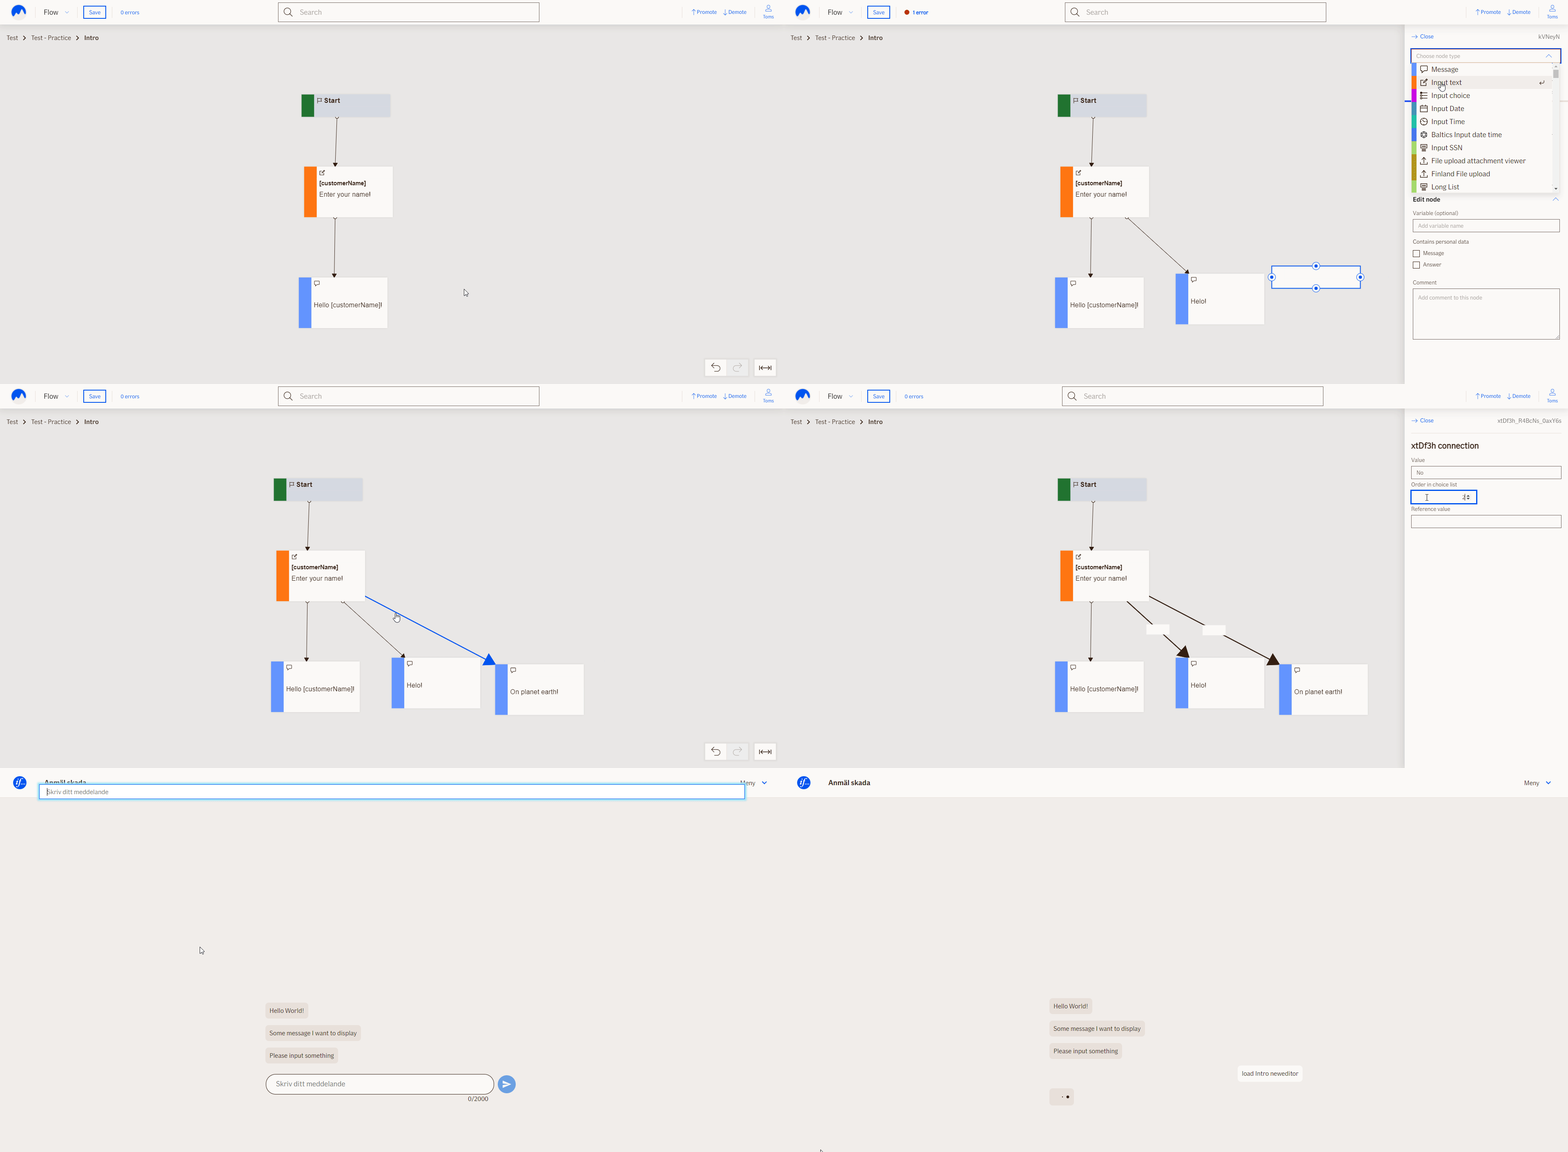
- Add Input node with multiple branches
- Every branch needs value for Order in choice list
- Add fallback choice with large number (e.g., 9999)
💡 Choices can be used to steer customer to specific questions based on previous answers. To add multiple choices, make a node that has an “Input” functionality and at least one more node to connect the second branch to. !! Each branch is a choice, and each branch must be configured to work correctly. “Order in choice list” must be filled. By adding a large number and no value, that branch will be picked up if no other choice is picked by the customer.
⛓ Task 4 — Node Chaining
Scenario
Customer wants to:
- Enter customer number & incident date
- List policies
- Choose a policy → list exposures
- Choose exposure → list occupational classes
🧪 Test data (ATEST environment)
HINT: test data will expire, so reach out to team and find up to date data (QA know everything about testing)
| Field | Value |
|---|---|
| Customer Number | WP0001204633 |
| Incident Date | 10.10.2021 |
New concept: Integration nodes
- Input properties – visible in Content or Properties tab
- Output properties – reference using:
[nodeName.outputProperty]
Example:
[occupationalClassesNode.ChosenOccupationalClass]
💡 Integration nodes These nodes are used to fetch information from internal IF services. Information like active policies if customer has provided SSN (social security number) or medication list approved by IF. Each node contains its input and output properties.
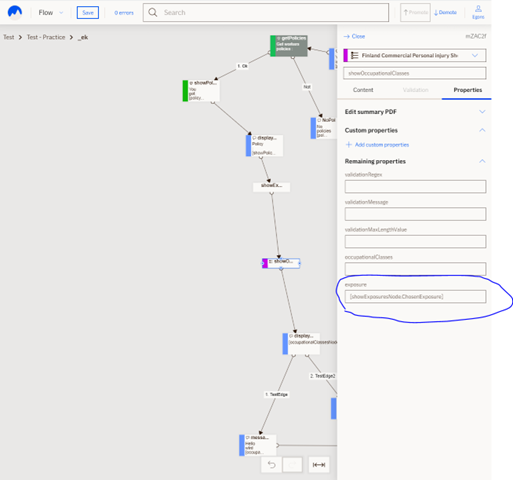
💡 Input properties are ment for node to function properly and most of them will be visible in Editors “Content” tab with specific input field. In case input property is not defined with specific input field it will be automaticly visible in “Properties” tab, this tab will map remaining input properties that node definition contains. For example FI PI ShowOccupational classes node has “exposures” input property that is not mapped in content tab, you can find it in properties tab.
💡 Output properties are other type of property that node defines. Usually output properties are used to store some value that can be later reused in flow by referencing it. Node output properties can be referenced by variable reference syntax:
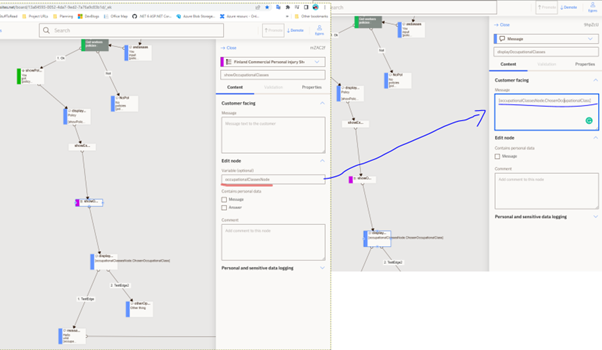
[nodeVariableName.outputPropertyKey]. For example FI PI ShowOccupational classes node does have output property for chosen occupational class. That can be accessed in editor like:[occupationalClassesNode.ChosenOccupationalClass]. In case of simple node that doesn’t define any ouput property like InputText type. Value can be referenced by default when just accessing node variable[nodeVariablename]itself or by accessing[nodeVariablename.Value]property. Also same every node does expose ”.Result” property which usually contain string that describe outcome of node logic. It can be:
“Ok” - in case of successful result
“Exception” – in case of unhandled exception happening
“Not” – in case process failed and got handled, like no data found for given search param
📬 Task 5 — Claim Registration
📌 As a claims handler I want to receive user responses so I can process them.
Acceptance Criteria:
- Use SendData node
- Summary sent to FrontEnd
- Email received at:
LVFMITNordicClaimsTest@if.lv - SMS sent to test phone
New concept: SendData Node
Connect flow values via references into SendData properties
💡 SendData node Claim registration only can be done when SendData node is reached. SendData node is an interface between highly dynamic, managed by business flows to our processing systems. It allows to send any value from the flow by referencing variable names in strict SendData Properties.
🧾 Task 6 — TellUs & Forms
Same but different
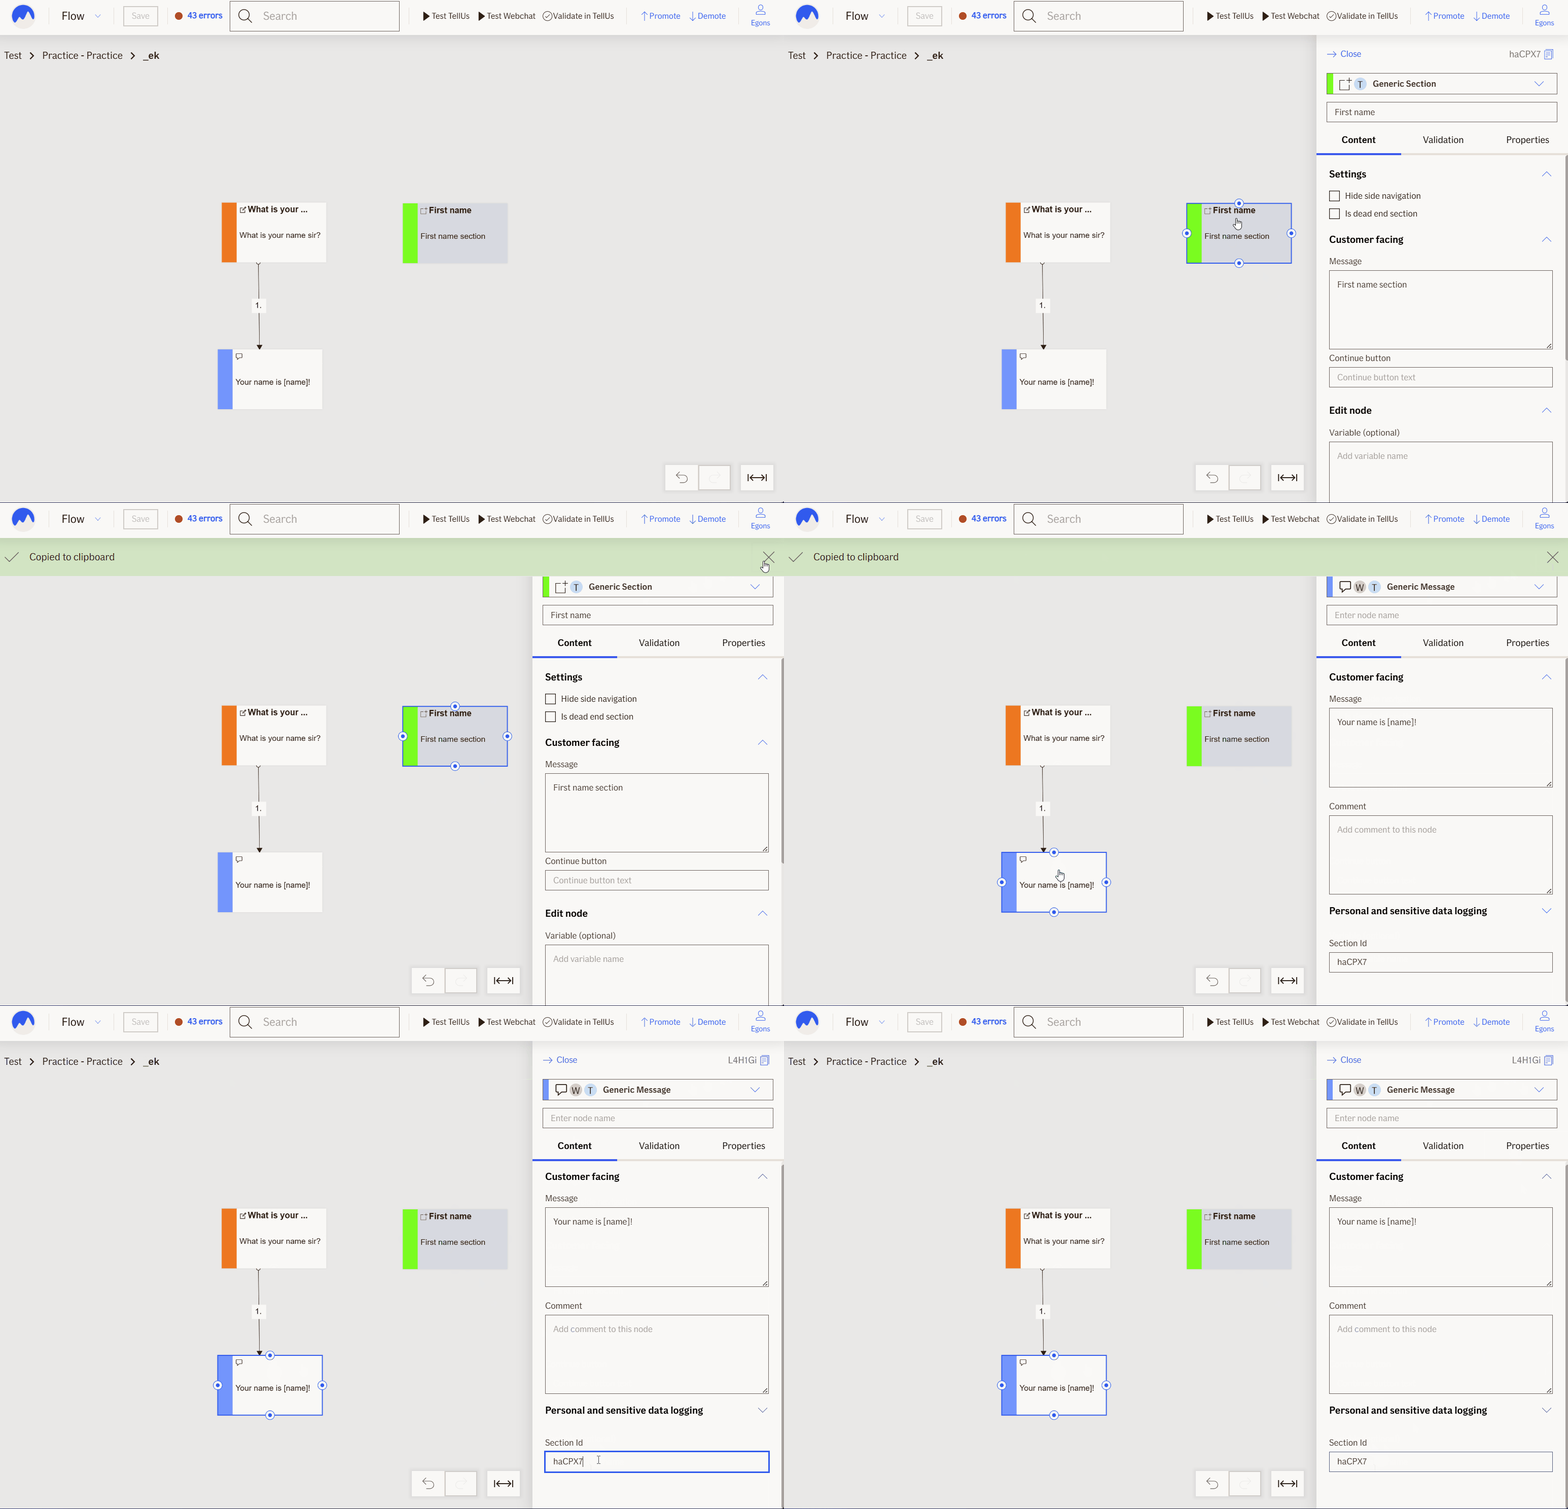
So far you have learned about Editor features and tried them out using Webchat. Webchat is one of our customer facing applications that can communicate with ChatBot and display the nodes using UI, our latest solution TellUs is being made to provide alternative UI which can display same flow in different manner. TellUs can read same flow and display all the items in single form. Forms can be defined using “Section” node in Editor. Each section node has unique ID that has to be placed on every node which you want to include in given section.
TellUs can display the same flow as Forms UI.
Try loading flow in TellUs
- Click Test TellUs button in the Editor
- Inspect URL parameters to load other flows
Sections
- Add Section Node to group elements
- All nodes within must share section ID
🧱 TellUs Nested section Example
Flow steps:
- Authenticate user
- Add "Reporter information" section with two sub sections:
- Personal info → firstname / lastname
- Address info → country / city
- Show Overview with collected data
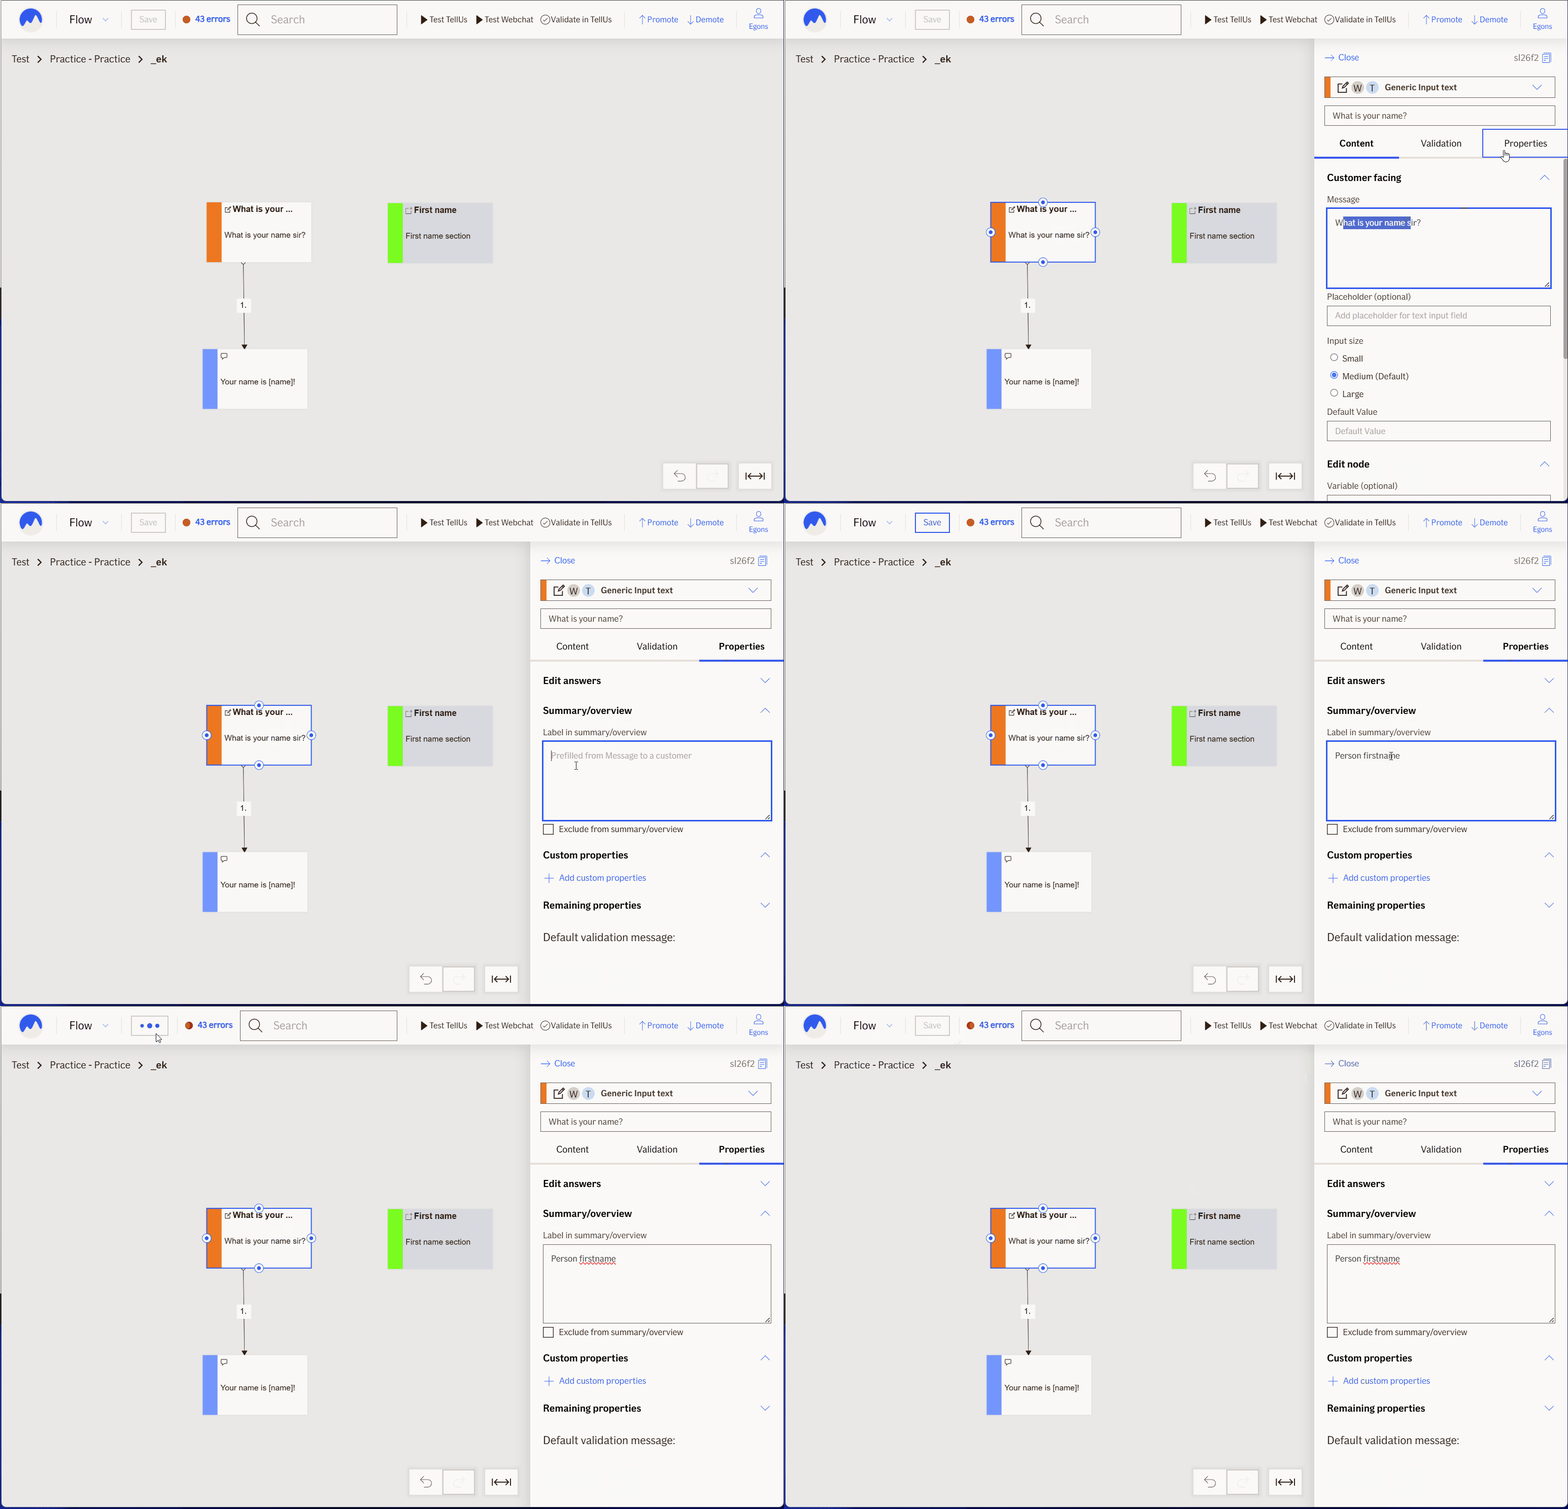
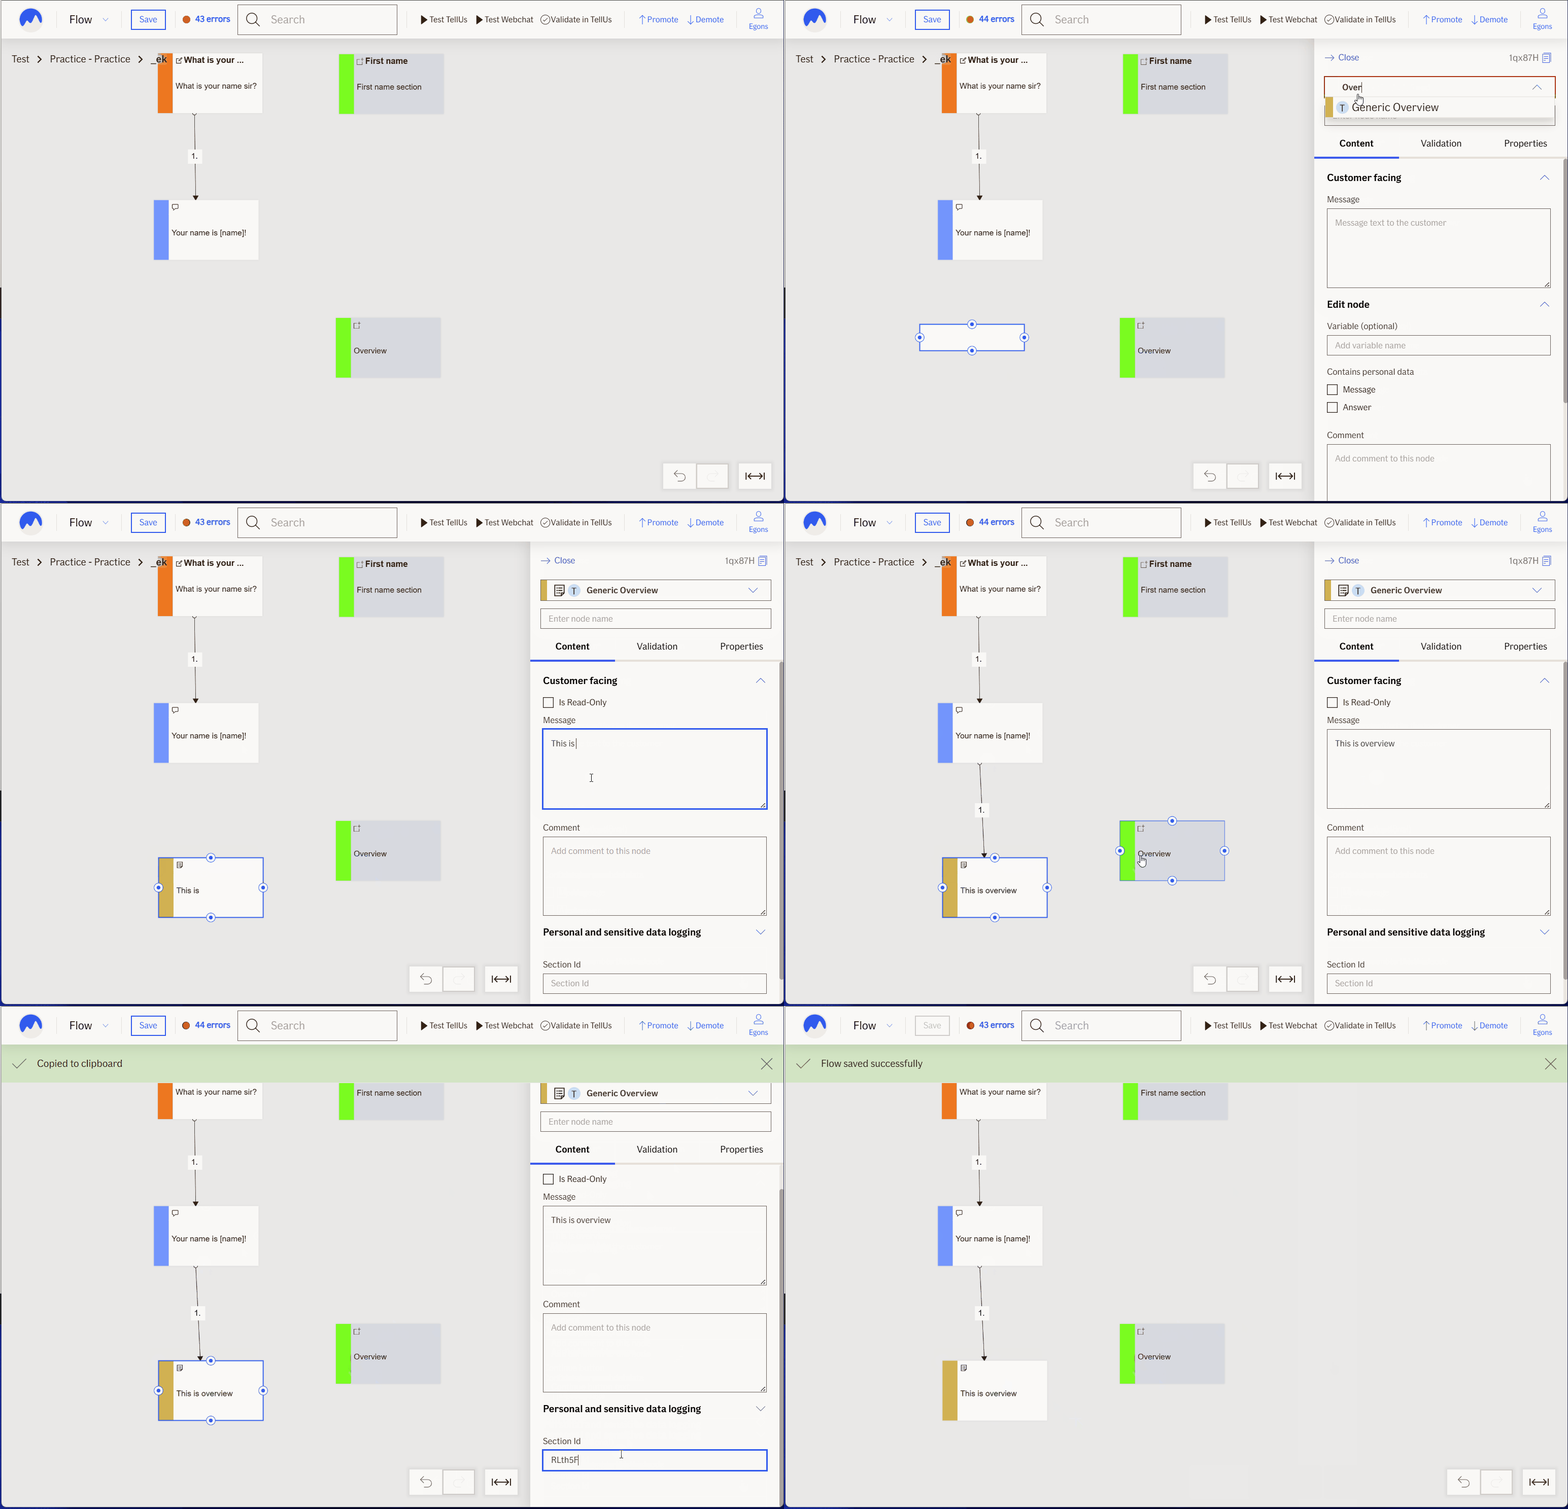
💡 Overview node : shows all completed inputs (unless excluded). Supports custom summary labels
Adding to overview:
Using overview:
🧹 Final step
👉 Delete your test flows when done
🎉 That’s it! Feedback welcome
If you see improvements — shout! Let’s keep this fun & interactive 😎